


Frontend version: Argon Dashboard v2.0.4. More info at https://www.creative-tim.com/product/argon-dashboard-pro
Vue version: Vue Argon Dashboard v3.0.0. More info at https://www.creative-tim.com/product/vue-argon-dashboard-pro

What if your frontend came not only with reusable components, but also with a reusable backend? API-driven development is more than just a buzzword and we partnered with UPDIVISION to prove it. Build awesome-looking apps with a flexible architecture across a variety of devices and operating systems with Vue Argon Dashboard Laravel.
Start your Development with an Innovative Admin Template for Bootstrap 5 and VueJS 3. If you like the look & feel of the hottest design trend right now, you will fall in love with this dashboard! It features a huge number of components built to fit together and look amazing.
Fully Coded Components
Vue Argon Dashboard 2 PRO is built with over 300 frontend individual elements, like buttons, inputs, navbars, nav tabs, cards, or alerts, giving you the freedom of choosing and combining. All components can take variations in color, which you can easily modify using SASS files and classes. You will save a lot of time going from prototyping to full-functional code because all elements are implemented.
This Premium Bootstrap 5 & VueJS 3 Dashboard is coming with prebuilt design blocks, so the development process is seamless, switching from our pages to the real website is very easy to be done.
View all components here.
JSON:API is a specification for how a client should request that resources be fetched or modified, and how a server should respond to those requests. It is designed to minimize both the number of requests and the amount of data transmitted between clients and servers. This efficiency is achieved without compromising readability, flexibility, or discoverability.
Click here to go to the JSON:API docs
The Laravel JSON:API backend project requires a working Apache/Nginx local environment with PHP, Composer and MySQL.
The Laravel JSON:API frontend project requires a working local environment with NodeJS version 8.9 or above (8.11.0+ recommended), npm, VueCLI.
If you don't already have a local development environment, use one of the following links:
- Windows: How to install WAMP on Windows
- Linux & Mac: How to install LAMP on Linux & Mac
Install Composer: https://getcomposer.org/doc/00-intro.md
Install Node: https://nodejs.org/ (version 8.11.0+ recommended)
Install NPM: https://www.npmjs.com/get-npm
Install VueCLI: https://cli.vuejs.org/guide/installation.html
- Navigate in your Laravel API project folder:
cd your-laravel-json-api-project - Install project dependencies:
composer install - Create a new .env file:
cp .env.example .env - Add your own database credentials in the .env file in DB_DATABASE, DB_USERNAME, DB_PASSWORD
- Create users table:
php artisan migrate --seed - Generate application key:
php artisan key:generate - Install Laravel Passport: php artisan passport:install and set in the .env file the CLIENT_ID and CLIENT_SECRET that you receive
- Add your own mailtrap.io credentials in MAIL_USERNAME and MAIL_PASSWORD in the .env file
- Navigate to your Vue Dashboard project folder:
cd your-vue-argon-dashbord-project - Install project dependencies:
npm install - Create a new .env file:
cp .env.example .env VUE_APP_BASE_URLshould contain the URL of your Vue Argon Dashboard Project (eg. http://localhost:8080/)VUE_APP_API_BASE_URLshould contain the URL of your Laravel JSON:API Project. (eg. http://localhost:3000/api/v1)- Run
npm run devto start the application in a local development environment ornpm run buildto build release distributables.
Register a user or login using admin@jsonapi.com and secret and start testing the theme.
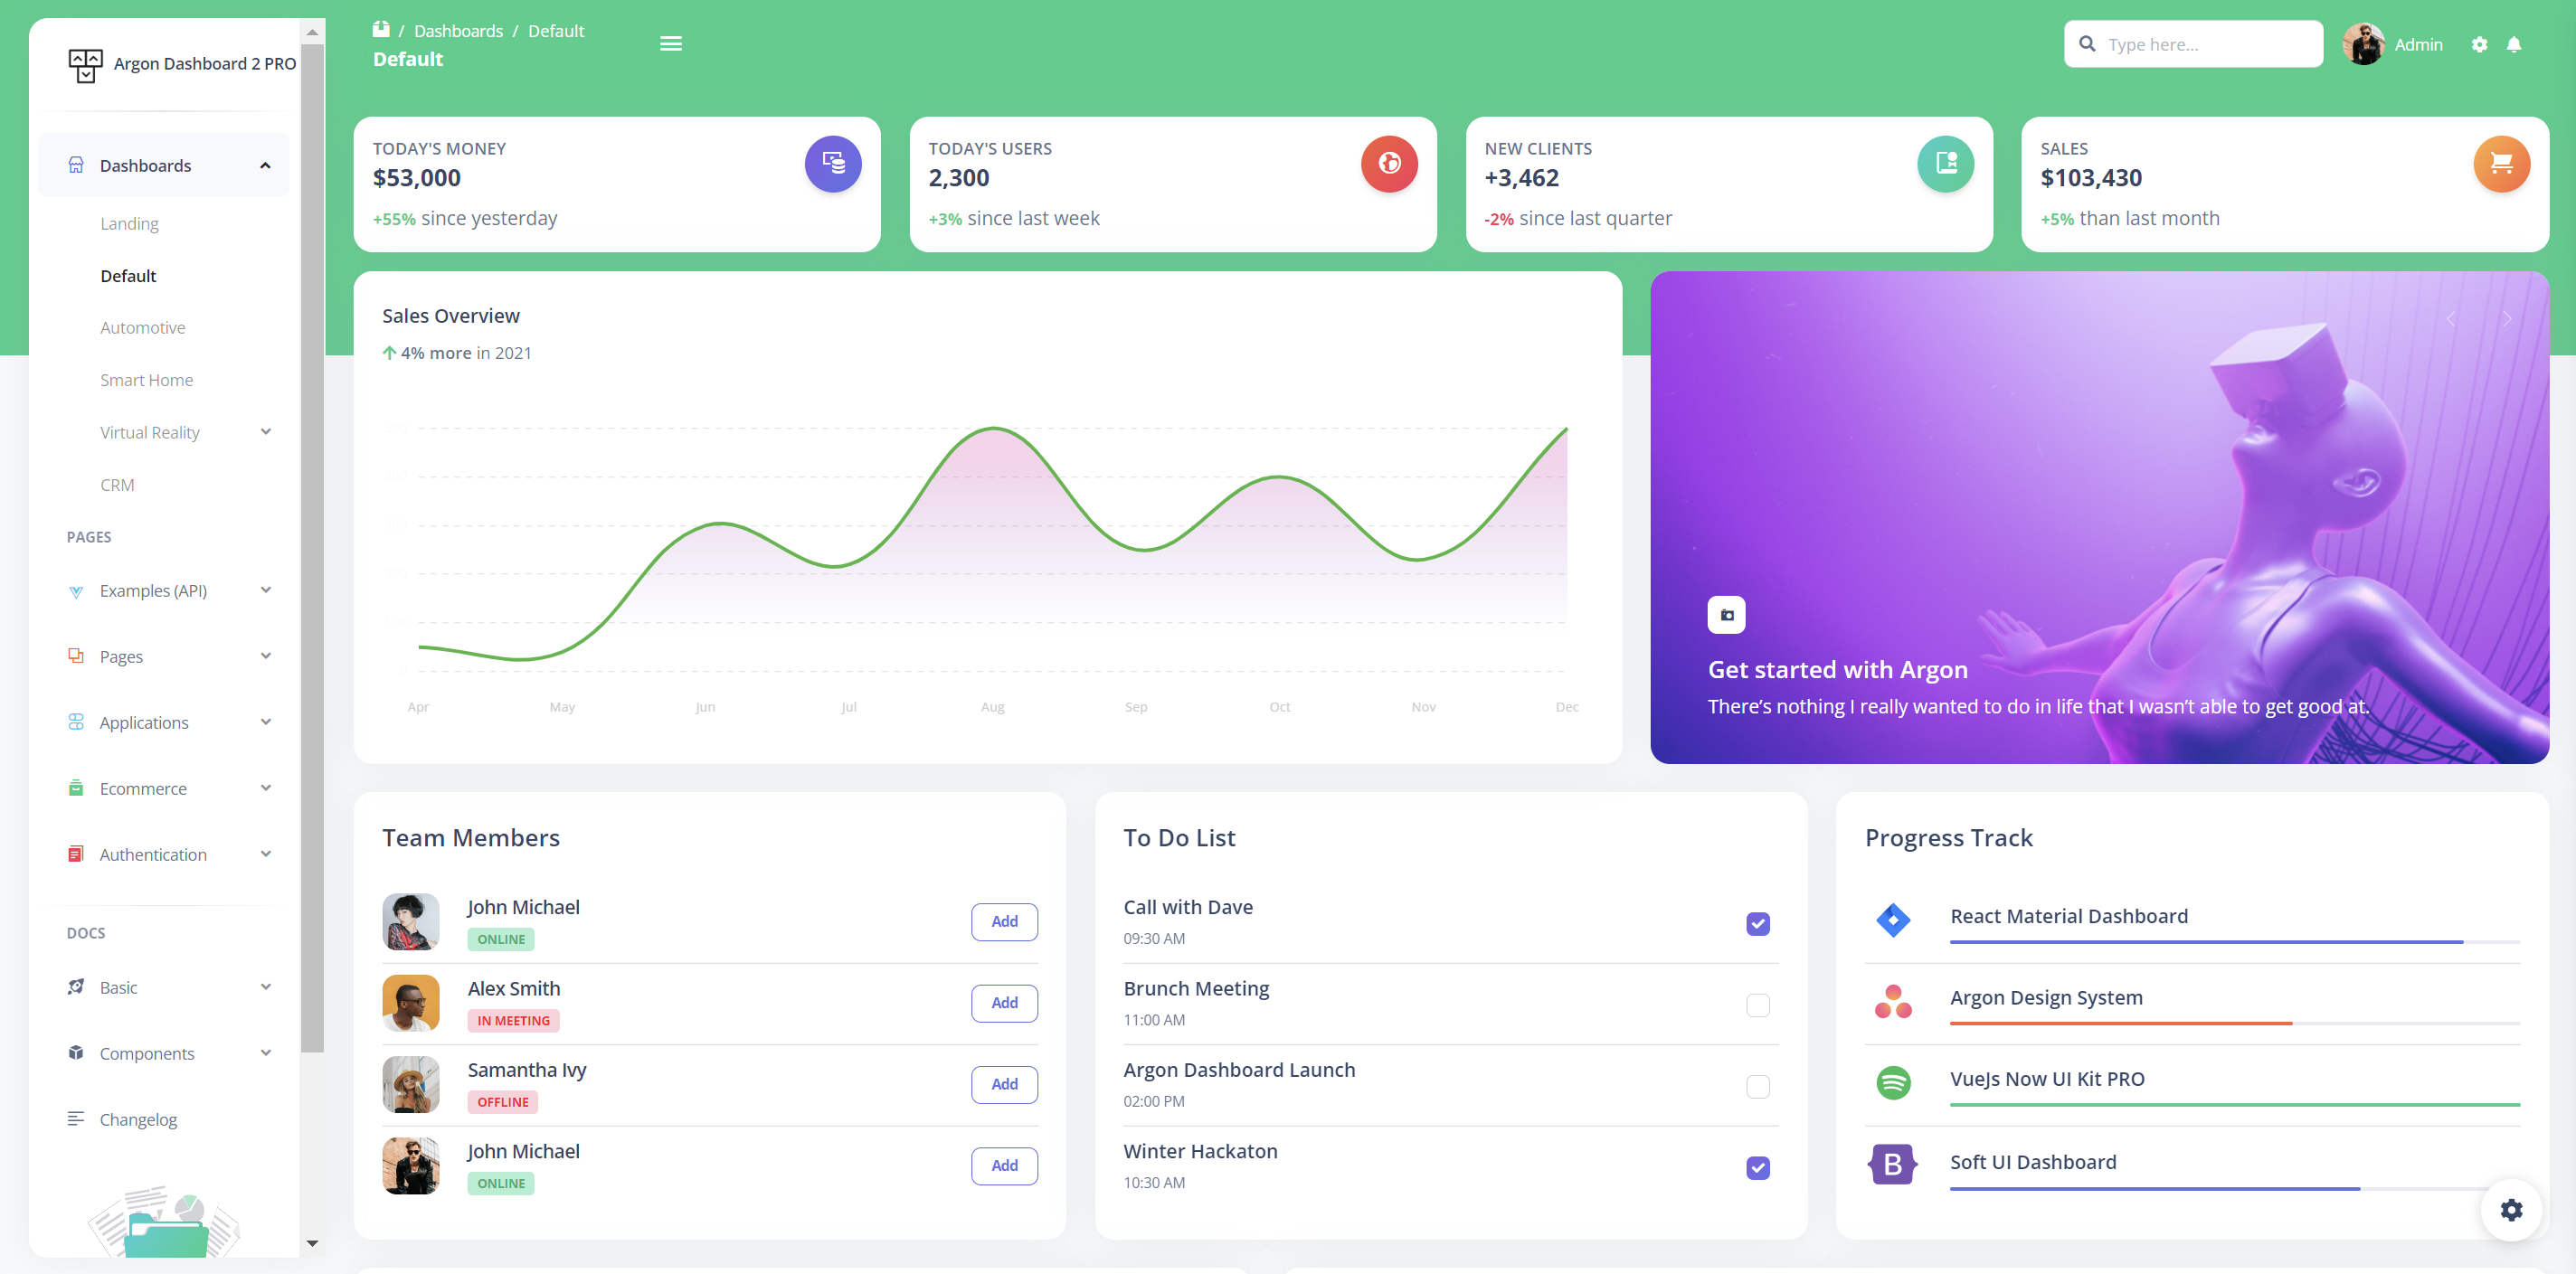
Besides the dashboard and the auth pages this theme also has an edit profile page. All the necessary files are installed out of the box and all the needed routes are added to src\router\index.js. Keep in mind that all the features can be viewed once you log in using the credentials provided above or by registering your own user.
You can access the dashboard either by using the "Dashboards/Default" link in the left sidebar or by adding /dashboards/dashboard-default in the URL.
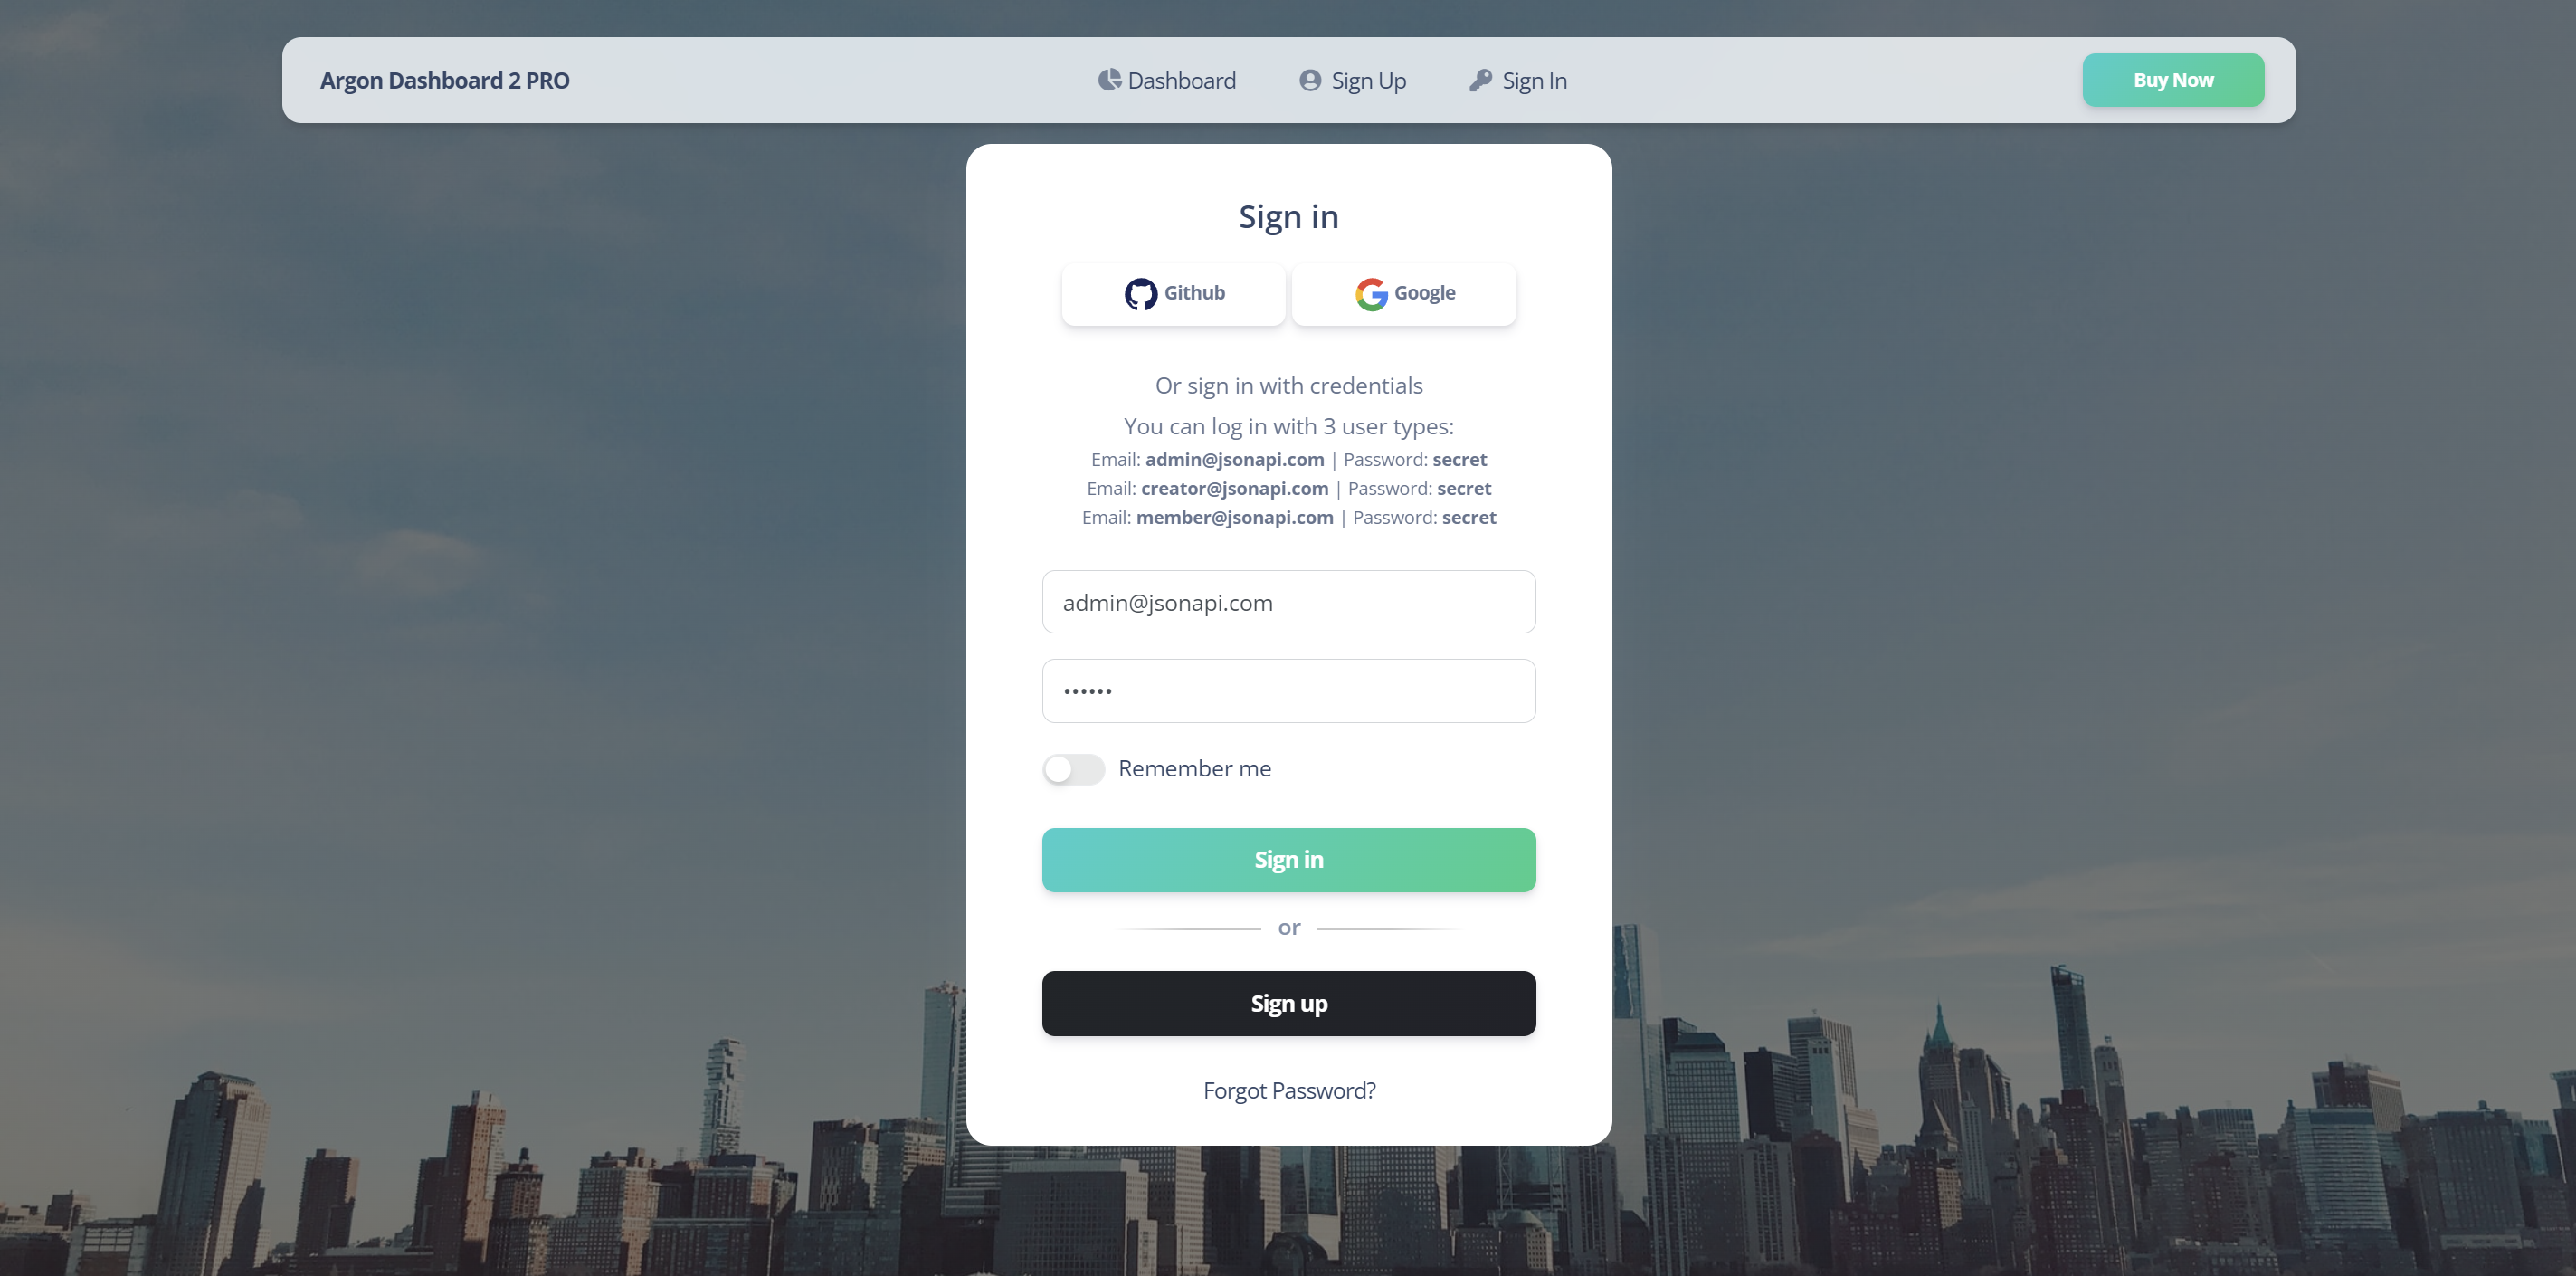
The login functionality is fully implemented in our theme helping you to start your project in no time. To login into dashboard you just have to add /login in the URL and fill the login form with one of the credentials (user: admin@jsonapi.com, creator@jsonapi.com, member@jsonapi.com and password: secret).
The src\views\auth\Login.vue is the Vue component which handles the login functinality. You can easily adapt it to your needs.
It uses the auth store located in src\store\auth.module.js and you can find the service file in src\services\auth.service.js.
<div class="container top-0 position-sticky z-index-sticky">
  <div class="row">
    <div class="col-12">
      <navbar
        is-blur="blur border-radius-lg my-3 py-2 start-0 end-0 mx-4 shadow"
        btn-background="bg-gradient-success"
        :dark-mode="true"
      />
    </div>
  </div>
</div>
<main class="main-content main-content-bg mt-0">
  <div
    class="page-header min-vh-100"
    style="
      background-image: url('https://raw.githubusercontent.com/creativetimofficial/public-assets/master/argon-dashboard-pro/assets/img/signin-basic.jpg');
    "
  >
    <span class="mask bg-gradient-dark opacity-6"></span>
    <div class="container">
      <div class="row justify-content-center">
        <div class="col-lg-4 col-md-7 mt-2">
          <div class="card border-0 mb-0">
            <div class="card-header bg-transparent">
              <h5 class="text-dark text-center mt-2 mb-3">Sign in</h5>
              <div class="btn-wrapper text-center">
                <a
                  href="javascript:;"
                  class="btn btn-neutral btn-icon btn-sm mb-0 me-1"
                >
                  <img
                    class="w-30"
                    src="../../assets/img/logos/github.svg"
                  />
                  Github
                </a>
                <a
                  href="javascript:;"
                  class="btn btn-neutral btn-icon btn-sm mb-0"
                >
                  <img
                    class="w-30"
                    src="../../assets/img/logos/google.svg"
                  />
                  Google
                </a>
              </div>
            </div>
            <div class="card-body px-lg-5 pt-0">
              <div class="text-center text-muted mb-4">
                <small>Or sign in with credentials</small>
              </div>
              <form role="form" class="text-start" @submit.prevent="handleLogin(user)">
                <div class="mb-3">
                  <argon-input
                    id="email"
                    v-model="user.email"
                    type="email"
                    placeholder="Email"
                    aria-label="Email"
                    :value="user.email"
                  />
                  <validation-error :errors="apiValidationErrors.email" />
                </div>
                <div class="mb-3">
                  <argon-input
                    id="password"
                    v-model="user.password"
                    type="password"
                    placeholder="Password"
                    aria-label="Password"
                    :value="user.password"
                  />
                </div>
                <argon-switch id="rememberMe" name="rememberMe">
                  Remember me
                </argon-switch>

                <div class="text-center">
                  <argon-button
                    color="success"
                    variant="gradient"
                    full-width
                    class="my-4 mb-2"
                    >Sign in</argon-button
                  >
                </div>
                <div class="mb-2 position-relative text-center">
                  <p
                    class="text-sm font-weight-bold mb-2 text-secondary text-border d-inline z-index-2 bg-white px-3"
                  >
                    or
                  </p>
                </div>
                <div class="text-center">
                  <router-link :to="{ name: 'Register' }">
                    <argon-button
                      type="button"
                      color="dark"
                      variant="gradient"
                      full-width
                      class="mt-2 mb-4"
                      >
                          Sign up
                      </argon-button>
                  </router-link>
                </div>
              </form>
              <router-link :to="{ name: 'Forgot Password' }" class="text-sm d-flex justify-content-center">Forgot Password?</router-link>
            </div>
          </div>
        </div>
      </div>
    </div>
  </div>
</main>
The register functionality is fully implemented in our theme helping you to start your project in no time. To register a new user you just have to add /register in the URL or click on register link from login page and fill the register form with user details.
The src\views\auth\Register.vue is the Vue component which handles the register functinality. You can easily extend it to your needs.
It uses the auth store located in src\store\auth.module.jsand you can find the service file in src\services\auth.service.js.
<div class="container top-0 position-sticky z-index-sticky">
  <div class="row">
    <div class="col-12">
      <navbar is-blur="blur border-radius-lg py-2 start-0 end-0 mx-4 shadow" btn-background="bg-gradient-success"
        :dark-mode="true" />
    </div>
  </div>
</div>
<main class="main-content main-content-bg mt-0">
  <div class="page-header min-vh-100" style="
      background-image: url('https://raw.githubusercontent.com/creativetimofficial/public-assets/master/argon-dashboard-pro/assets/img/signup-basic.jpg');
    ">
    <span class="mask bg-gradient-dark opacity-6"></span>
    <div class="container mt-4">
      <div class="row justify-content-center">
        <div class="col-lg-4 col-md-7">
          <div class="card z-index-0">
            <div class="card-header text-center pt-4">
              <h5>Register with</h5>
            </div>
            <div class="row px-xl-5 px-sm-4 px-3">
              <div class="col-3 ms-auto px-1">
                <a class="btn btn-outline-light w-100" href="javascript:;">
                  <svg width="24px" height="32px" viewBox="0 0 64 64" version="1.1">
                    <g stroke="none" stroke-width="1" fill="none" fill-rule="evenodd">
                      <g transform="translate(3.000000, 3.000000)" fill-rule="nonzero">
                        <circle fill="#3C5A9A" cx="29.5091719" cy="29.4927506" r="29.4882047" />
                        <path
                          d="M39.0974944,9.05587273 L32.5651312,9.05587273 C28.6886088,9.05587273 24.3768224,10.6862851 24.3768224,16.3054653 C24.395747,18.2634019 24.3768224,20.1385313 24.3768224,22.2488655 L19.8922122,22.2488655 L19.8922122,29.3852113 L24.5156022,29.3852113 L24.5156022,49.9295284 L33.0113092,49.9295284 L33.0113092,29.2496356 L38.6187742,29.2496356 L39.1261316,22.2288395 L32.8649196,22.2288395 C32.8649196,22.2288395 32.8789377,19.1056932 32.8649196,18.1987181 C32.8649196,15.9781412 35.1755132,16.1053059 35.3144932,16.1053059 C36.4140178,16.1053059 38.5518876,16.1085101 39.1006986,16.1053059 L39.1006986,9.05587273 L39.0974944,9.05587273 L39.0974944,9.05587273 Z"
                          fill="#FFFFFF" />
                      </g>
                    </g>
                  </svg>
                </a>
              </div>
              <div class="col-3 px-1">
                <a class="btn btn-outline-light w-100" href="javascript:;">
                  <svg width="24px" height="32px" viewBox="0 0 64 64" version="1.1">
                    <g stroke="none" stroke-width="1" fill="none" fill-rule="evenodd">
                      <g transform="translate(7.000000, 0.564551)" fill="#000000" fill-rule="nonzero">
                        <path
                          d="M40.9233048,32.8428307 C41.0078713,42.0741676 48.9124247,45.146088 49,45.1851909 C48.9331634,45.4017274 47.7369821,49.5628653 44.835501,53.8610269 C42.3271952,57.5771105 39.7241148,61.2793611 35.6233362,61.356042 C31.5939073,61.431307 30.2982233,58.9340578 25.6914424,58.9340578 C21.0860585,58.9340578 19.6464932,61.27947 15.8321878,61.4314159 C11.8738936,61.5833617 8.85958554,57.4131833 6.33064852,53.7107148 C1.16284874,46.1373849 -2.78641926,32.3103122 2.51645059,22.9768066 C5.15080028,18.3417501 9.85858819,15.4066355 14.9684701,15.3313705 C18.8554146,15.2562145 22.5241194,17.9820905 24.9003639,17.9820905 C27.275104,17.9820905 31.733383,14.7039812 36.4203248,15.1854154 C38.3824403,15.2681959 43.8902255,15.9888223 47.4267616,21.2362369 C47.1417927,21.4153043 40.8549638,25.1251794 40.9233048,32.8428307 M33.3504628,10.1750144 C35.4519466,7.59650964 36.8663676,4.00699306 36.4804992,0.435448578 C33.4513624,0.558856931 29.7884601,2.48154382 27.6157341,5.05863265 C25.6685547,7.34076135 23.9632549,10.9934525 24.4233742,14.4943068 C27.7996959,14.7590956 31.2488715,12.7551531 33.3504628,10.1750144" />
                      </g>
                    </g>
                  </svg>
                </a>
              </div>
              <div class="col-3 me-auto px-1">
                <a class="btn btn-outline-light w-100" href="javascript:;">
                  <svg width="24px" height="32px" viewBox="0 0 64 64" version="1.1">
                    <g stroke="none" stroke-width="1" fill="none" fill-rule="evenodd">
                      <g transform="translate(3.000000, 2.000000)" fill-rule="nonzero">
                        <path
                          d="M57.8123233,30.1515267 C57.8123233,27.7263183 57.6155321,25.9565533 57.1896408,24.1212666 L29.4960833,24.1212666 L29.4960833,35.0674653 L45.7515771,35.0674653 C45.4239683,37.7877475 43.6542033,41.8844383 39.7213169,44.6372555 L39.6661883,45.0037254 L48.4223791,51.7870338 L49.0290201,51.8475849 C54.6004021,46.7020943 57.8123233,39.1313952 57.8123233,30.1515267"
                          fill="#4285F4" />
                        <path
                          d="M29.4960833,58.9921667 C37.4599129,58.9921667 44.1456164,56.3701671 49.0290201,51.8475849 L39.7213169,44.6372555 C37.2305867,46.3742596 33.887622,47.5868638 29.4960833,47.5868638 C21.6960582,47.5868638 15.0758763,42.4415991 12.7159637,35.3297782 L12.3700541,35.3591501 L3.26524241,42.4054492 L3.14617358,42.736447 C7.9965904,52.3717589 17.959737,58.9921667 29.4960833,58.9921667"
                          fill="#34A853" />
                        <path
                          d="M12.7159637,35.3297782 C12.0932812,33.4944915 11.7329116,31.5279353 11.7329116,29.4960833 C11.7329116,27.4640054 12.0932812,25.4976752 12.6832029,23.6623884 L12.6667095,23.2715173 L3.44779955,16.1120237 L3.14617358,16.2554937 C1.14708246,20.2539019 0,24.7439491 0,29.4960833 C0,34.2482175 1.14708246,38.7380388 3.14617358,42.736447 L12.7159637,35.3297782"
                          fill="#FBBC05" />
                        <path
                          d="M29.4960833,11.4050769 C35.0347044,11.4050769 38.7707997,13.7975244 40.9011602,15.7968415 L49.2255853,7.66898166 C44.1130815,2.91684746 37.4599129,0 29.4960833,0 C17.959737,0 7.9965904,6.62018183 3.14617358,16.2554937 L12.6832029,23.6623884 C15.0758763,16.5505675 21.6960582,11.4050769 29.4960833,11.4050769"
                          fill="#EB4335" />
                      </g>
                    </g>
                  </svg>
                </a>
              </div>
              <div class="mt-2 position-relative text-center">
                <p class="text-sm font-weight-bold mb-2 text-secondary text-border d-inline z-index-2 bg-white px-3">
                  or
                </p>
              </div>
            </div>
            <div class="card-body">
              <form role="form" @submit.prevent="handleRegister(user)">
                <argon-input id="name" v-model="user.name" type="text" placeholder="Name" aria-label="Name"
                  :value="user.name" />
                <argon-input id="email" v-model="user.email" type="email" placeholder="Email" aria-label="Email"
                  :value="user.email" />
                <validation-error id="registerValidation" :errors="apiValidationErrors.email" />
                <argon-input id="password" v-model="user.password" type="password" placeholder="Password"
                  aria-label="Password" :value="user.password" />
                <validation-error id="registerValidation" :errors="apiValidationErrors.password" />
                <argon-input id="confirm-password" v-model="user.confirm_password" type="password"
                  placeholder="Confirm Password" aria-label="Confirm Password" :value="user.confirm_password" />
                <argon-checkbox id="flexCheckDefault" v-model="terms_conditions" name="flexCheckDefault">
                  <label class="form-check-label" for="flexCheckDefault">
                    I agree the
                    <a href="javascript:;" class="text-dark font-weight-bolder">Terms and Conditions</a>
                  </label>
                </argon-checkbox>
                <div class="text-center">
                  <argon-button full-width color="dark" variant="gradient" class="my-4 mb-2">Sign up</argon-button>
                </div>
                <p class="text-sm mt-3 mb-0">
                  Already have an account?
                  <router-link :to="{ name: 'Login' }" class="text-dark font-weight-bolder">
                    Sign in
                  </router-link>
                </p>
              </form>
            </div>
          </div>
        </div>
      </div>
    </div>
  </div>
</main>
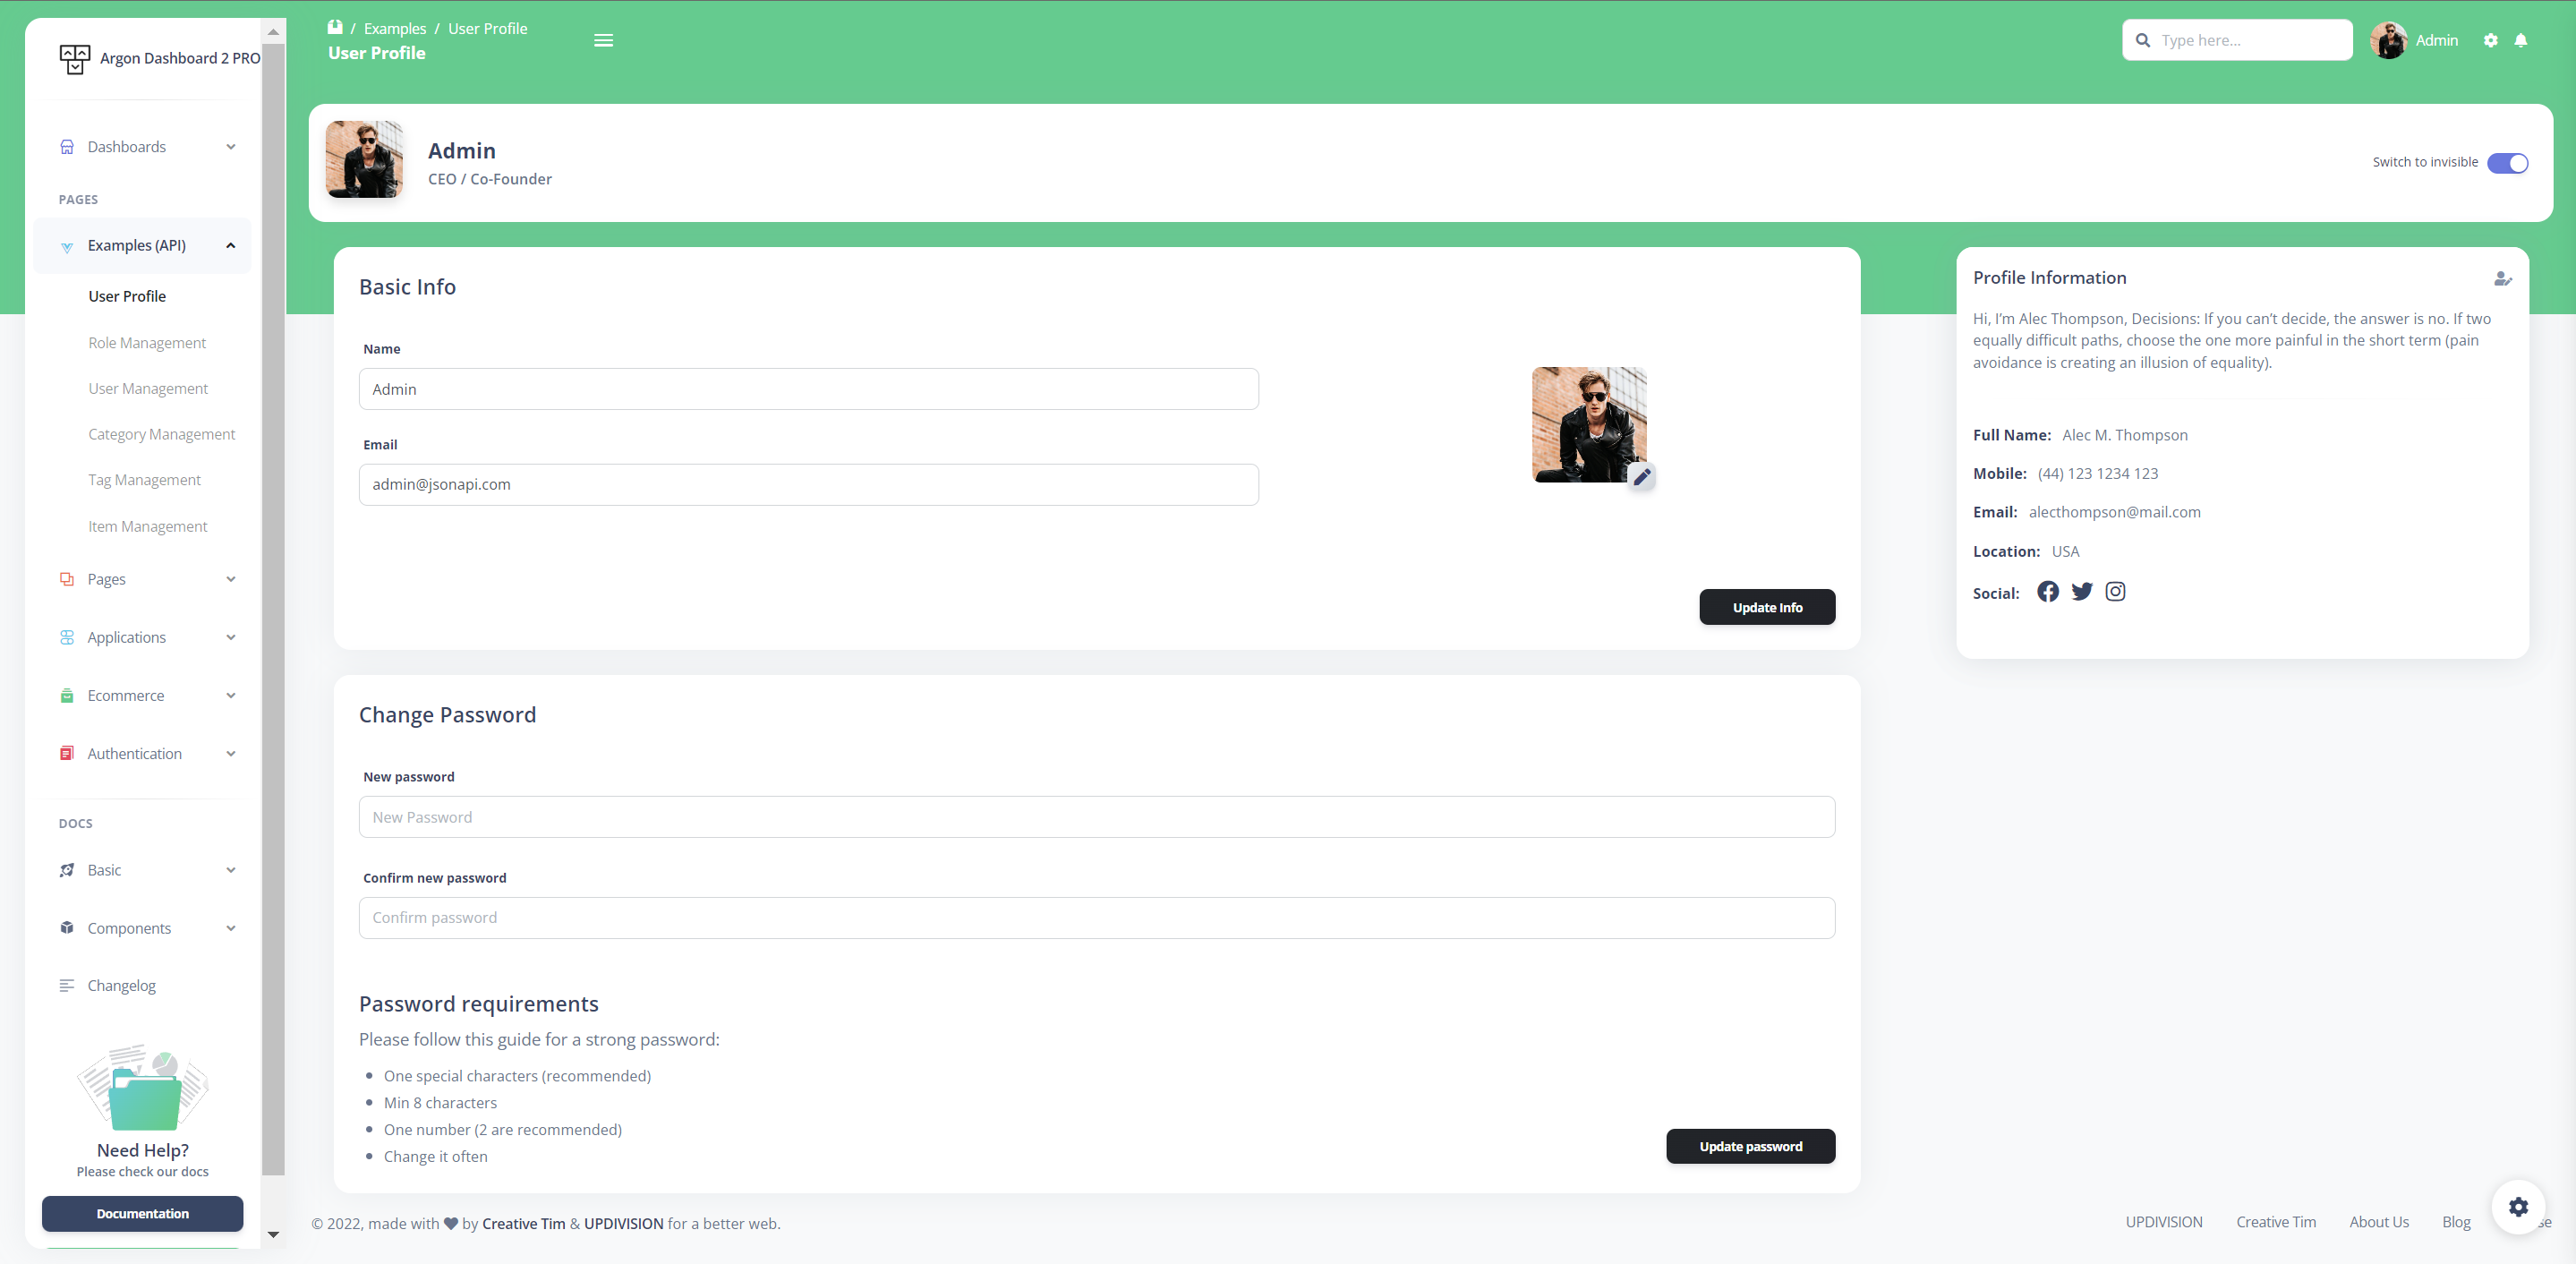
You have the option to edit the current logged in user's profile information (name, email, profile picture) and password. To access this page, just click the "Examples (API)/User Profile" link in the left sidebar or add /examples/user-profile in the URL.
The src\views\examplesApi\UserProfile is the folder with Profile Vue component that handle the update of the user information and password.
The store used for profile functionality is found in src\store\profile.module.js and you can find the service file in src\services\profile.service.js.
<template>
  <div id="profile" class="card card-body mt-4 m-usercard">
    <div class="row justify-content-center align-items-center">
      <div class="col-sm-auto col-4">
        <argon-avatar
          :img="profileImage()"
          :alt="user.name"
          size="xl"
          shadow="sm"
          border-radius="lg"
        />
      </div>
      <div class="col-sm-auto col-8 my-auto">
        <div class="h-100">
          <h5 class="mb-1 font-weight-bolder">{{ user.name }}</h5>
          <p class="mb-0 font-weight-bold text-sm">CEO / Co-Founder</p>
        </div>
      </div>
      <div class="col-sm-auto ms-sm-auto mt-sm-0 mt-3 d-flex">
        <label class="form-check-label mb-0 me-2">
          <small id="profileVisibility">Switch to invisible</small>
        </label>
        <argon-switch
          id="switch-invisible"
          name="Switch to Invisible"
          checked
        />
      </div>
    </div>
  </div>
  <div class="d-flex justify-content-around">
    <div class="col-lg-8 mw-100 w-100-userprofile">
      <form role="form" @submit.prevent="handleChangeProfile()">
        <div id="basic-info" class="card mt-4">
          <div class="card-header">
            <h5>Basic Info</h5>
          </div>
          <div class="card-body pt-0">
            <div class="d-flex justify-content-between">
              <div class="col-lg-8">
                <div class="row">
                  <div class="col-11">
                    <label class="form-label">Name</label>
                    <argon-input
                      id="name"
                      v-model="userToUpdate.name"
                      type="text"
                      :value="userToUpdate.name"
                    />
                    <validation-error :errors="apiValidationErrors.name" />
                  </div>
                </div>
                <div class="row">
                  <div class="col-11">
                    <label class="form-label mt-2">Email</label>
                    <argon-input
                      id="email"
                      v-model="userToUpdate.email"
                      type="email"
                      placeholder="example@email.com"
                      :value="userToUpdate.email"
                    />
                    <validation-error :errors="apiValidationErrors.email" />
                  </div>
                </div>
              </div>
              <div class="col-lg-4 d-flex align-items-center text-center">
                <div class="col-12">
                  <div class="avatar avatar-xxl position-relative">
                    <img
                      :src="previewImage()"
                      class="border-radius-md w-100 h-100"
                      alt="team-2"
                    />
                    <i
                      class="fa fa-pen userprofile-button bottom-0 position-absolute end-0"
                    ></i>
                    <input
                      type="file"
                      class="uploadImage bottom-0 btn btn-sm btn-icon-only bg-gradient-light position-absolute end-0 mb-n2 me-n2"
                      accept="image/png, image/jpg, image/jpeg"
                      @input="onFileChange"
                    />
                    <argon-button
                      v-if="image"
                      type="button"
                      class="removeImage bottom-0 btn btn-sm btn-icon-only position-absolute start-0 mb-n2"
                      @click="removeImage"
                      ><i class="fa fa-remove"></i
                    ></argon-button>
                  </div>
                </div>
              </div>
            </div>
            <div class="d-flex justify-content-end">
              <validation-error :errors="apiValidationErrors.attachment" />
            </div>
            <argon-button
              class="float-end mt-6 mb-0"
              color="dark"
              variant="gradient"
              size="sm"
              >Update Info
            </argon-button>
          </div>
        </div>
      </form>
      <form role="form" @submit.prevent="handleChangeProfile()">
        <div id="password" class="card mt-4">
          <div class="card-header">
            <h5>Change Password</h5>
          </div>
          <div class="card-body pt-0">
            <label class="form-label">New password</label>
            <argon-input
              id="new-password"
              v-model="userToUpdate.password"
              type="password"
              placeholder="New Password"
              :value="userToUpdate.password"
            />
            <div class="row mb-2">
              <validation-error :errors="apiValidationErrors.password" />
            </div>
            <label class="form-label">Confirm new password</label>
            <argon-input
              id="confirm-password"
              v-model="userToUpdate.password_confirmation"
              type="password"
              placeholder="Confirm password"
              :value="userToUpdate.password_confirmation"
            />
            <h5 class="mt-5">Password requirements</h5>
            <p class="text-muted mb-2">
              Please follow this guide for a strong password:
            </p>
            <ul class="text-muted ps-4 mb-0 float-start">
              <li>
                <span class="text-sm">One special characters</span>
              </li>
              <li>
                <span class="text-sm">Min 8 characters</span>
              </li>
              <li>
                <span class="text-sm">One number (2 are recommended)</span>
              </li>
              <li>
                <span class="text-sm">Change it often</span>
              </li>
            </ul>
            <argon-button
              class="float-end mt-6 mb-0"
              color="dark"
              variant="gradient"
              size="sm"
              >Update password
            </argon-button>
          </div>
        </div>
      </form>
    </div>
    <div
      class="card position-sticky top-1 mt-4 h-100 col-lg-3 d-md-inline d-none mw-30"
    >
      <profile-info-card
        title="Profile Information"
        description="Hi, I’m Alec Thompson, Decisions: If you can’t decide, the answer is no. If two equally difficult paths, choose the one more painful in the short term (pain avoidance is creating an illusion of equality)."
        :info="{
          fullName: 'Alec M. Thompson',
          mobile: '(44) 123 1234 123',
          email: 'alecthompson@mail.com',
          location: 'USA',
        }"
        :social="[
          {
            link: 'https://www.facebook.com/CreativeTim/',
            icon: 'fab fa-facebook fa-lg',
          },
          {
            link: 'https://twitter.com/creativetim',
            icon: 'fab fa-twitter fa-lg',
          },
          {
            link: 'https://www.instagram.com/creativetimofficial/',
            icon: 'fab fa-instagram fa-lg',
          },
        ]"
        :action="{
          route: 'javascript:;',
          tooltip: 'Edit Profile',
        }"
      />
    </div>
  </div>
</template>
The Pro theme allows you to add user roles. By default, the theme comes with Admin, Creator and Member roles. To access the role management example click the "Examples (API)/Role Management" link in the left sidebar or add /examples/role-management/list-roles to the URL. Here you can add/edit new roles. To add a new role, click the "Add role" button. To edit an existing role, click the edit role icon from table. In both cases, you will be directed to a form which allows you to modify the name of a role.
You can find the compoments for role functionality in src\views\examplesApi\RoleManagement folder.
The store used for role functionality is found in src\store\role.module.js and you can find the service file in src\services\role.service.js.
<template>
  <div class="py-4 container-fluid">
    <div class="row">
      <div class="col-12">
        <div class="card">
          <!-- Card header -->
          <div class="pb-0 card-header">
            <div class="d-lg-flex">
              <div>
                <h5 class="mb-0">Role List</h5>
              </div>
              <div class="my-auto mt-4 ms-auto mt-lg-0">
                <div class="my-auto ms-auto">
                  <router-link :to="{ name: 'Add Role' }"
                    class="mb-0 btn bg-gradient-success btn-sm">
                      <i class="fa fa-plus me-1"/> Add Role
                  </router-link>
                </div>
              </div>
            </div>
          </div>
          <hr>
          <div class="px-0 pb-0 card-body">
            <div class="dataTable-search search-block">
                <input v-model="search" class="dataTable-input search-input-table" placeholder="Search..." type="text">
            </div>
            <div class="table-responsive">
              <table id="role-list" ref="roleList" class="table table-flush">
                <thead class="thead-light">
                  <tr>
                    <th title="name">Name</th>
                    <th title="created_at">Create at</th>
                    <th data-sortable="false">Action</th>
                  </tr>
                </thead>
                <tbody class="text-sm">
                </tbody>
                <tfoot>
                  <tr>
                    <th>Name</th>
                    <th>Create at</th>
                    <th>Action</th>
                  </tr>
                </tfoot>
              </table>
            </div>
          </div>
        </div>
      </div>
    </div>
  </div>
</template>
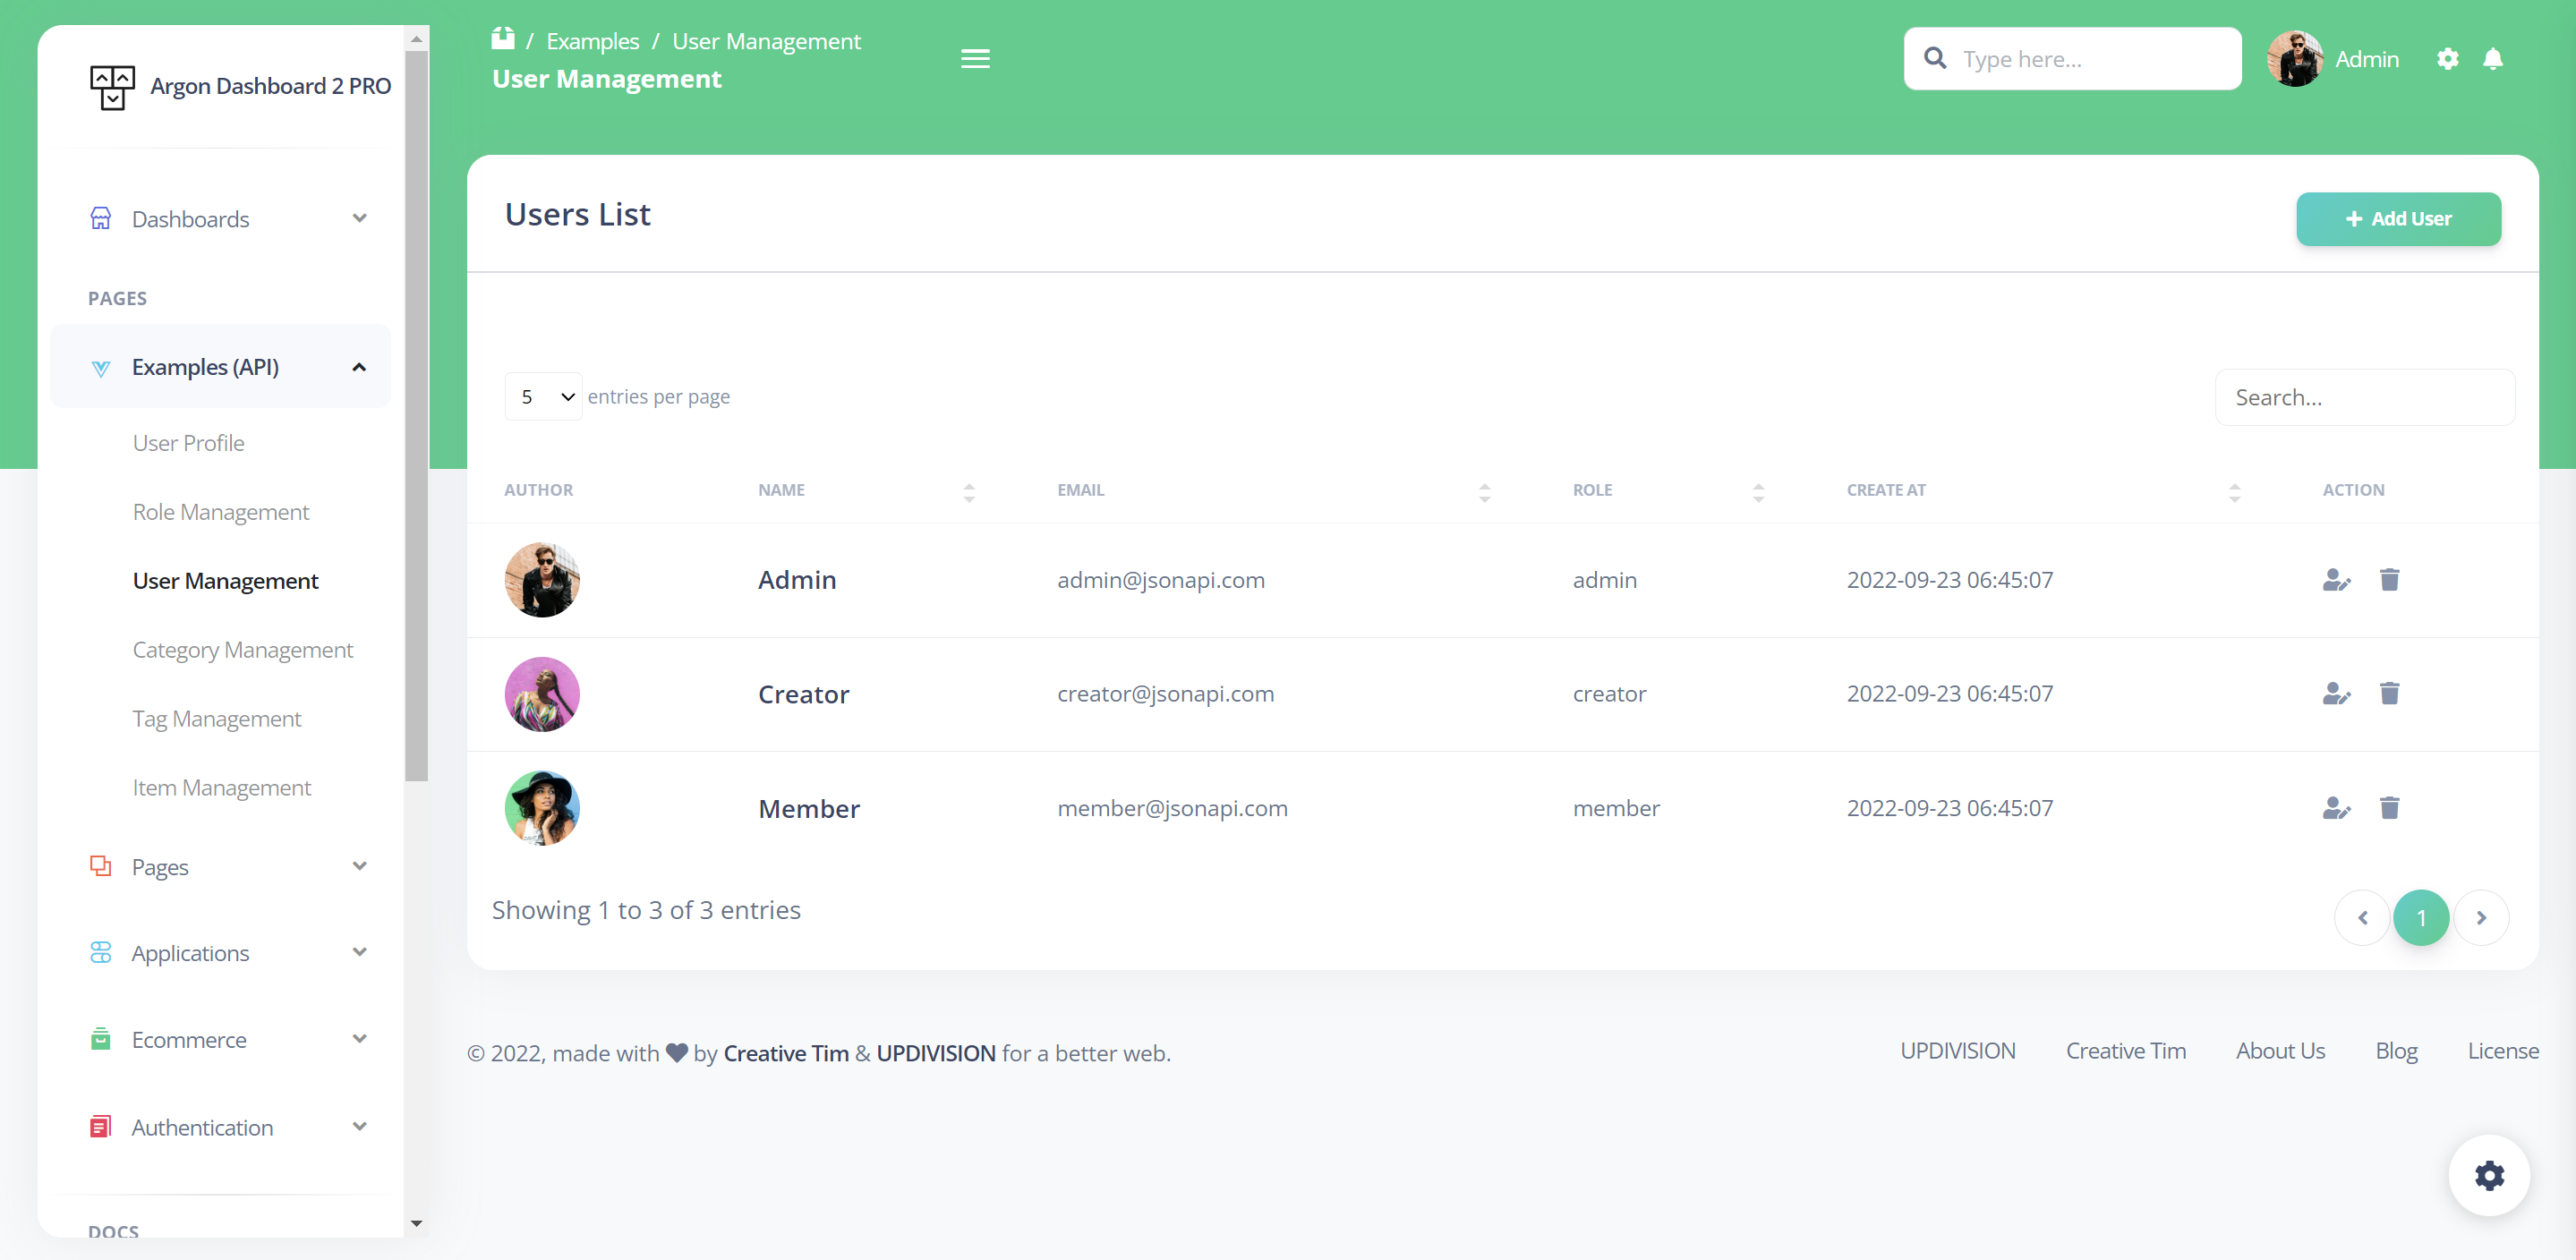
The Pro theme comes with an out of the box user management option. To access this option ,click the "Examples (API)/User Management" link in the left sidebar or add /examples/user-management/list-users to the URL. The first thing you will see is a list of existing users. You can add new ones by clicking the "Add user" button (above the table on the right). On the Add user page, you will find a form which allows you to fill out the user`s name, email, role and password.
The store used for user functionality is found in src\store\user.module.js and you can find the service file in src\services\user.service.js.
You can find the compoments for user functionality in src\views\examplesApi\UserManagement folder.
Once you add more users, the list will grow and for every user you will have edit and delete options (access these options by clicking the icons for those actions that appears at the end of every row).
<template>
  <div class="py-4 container-fluid">
    <div class="row">
      <div class="col-12">
        <div class="card">
          <!-- Card header -->
          <div class="pb-0 card-header">
            <div class="d-lg-flex">
              <div>
                <h5 class="mb-0">Users List</h5>
              </div>
              <div class="my-auto mt-4 ms-auto mt-lg-0">
                <div class="my-auto ms-auto">
                  <router-link :to="{ name: 'User Add' }" class="mb-0 btn bg-gradient-success btn-sm">
                    <i class="fa fa-plus me-1" /> Add User
                  </router-link>
                </div>
              </div>
            </div>
          </div>
          <hr>
          <div class="px-0 pb-0 card-body">
            <div class="dataTable-search search-block">
                <input v-model="search" class="dataTable-input search-input-table" placeholder="Search..." type="text">
            </div>
            <div class="table-responsive">
              <table id="user-list" ref="userList" class="table table-flush">
                <thead class="thead-light">
                  <tr>
                    <th data-sortable="false">Author</th>
                    <th title="name">Name</th>
                    <th title="email">Email</th>
                    <th title="roles.name">Role</th>
                    <th title="created_at">Create at</th>
                    <th data-sortable="false">Action</th>
                  </tr>
                </thead>
                <tbody class="text-sm">
                </tbody>
                <tfoot>
                  <tr>
                    <th>Author</th>
                    <th>Name</th>
                    <th>Email</th>
                    <th>Role</th>
                    <th>Create at</th>
                    <th>Action</th>
                  </tr>
                </tfoot>
              </table>
            </div>
          </div>
        </div>
      </div>
    </div>
  </div>
</template>
Out of the box you will have an example of category management (for the cases in which you are developing a blog or a shop). To access this example, click the "Examples (API)/Category Management" link in the left sidebar or add /examples/category-management/list-categories to the URL. You can add and edit categories here, but you can only delete them if they are not attached to any items.
You can find the compoments for category functionality in src\views\examplesApi\CategoryManagement folder.
The store used for category functionality is found in src\store\category.module.js and you can find the service file in src\services\category.service.js.
<template>
    <div class="py-4 container-fluid">
        <div class="row">
            <div class="col-12">
                <div class="card">
                    <!-- Card header -->
                    <div class="pb-0 card-header">
                        <div class="d-lg-flex">
                            <div>
                                <h5 class="mb-0">Category List</h5>
                            </div>
                            <div class="my-auto mt-4 ms-auto mt-lg-0">
                                <div class="my-auto ms-auto">
                                    <router-link :to="{ name: 'Category Add' }"
                                        class="mb-0 btn bg-gradient-success btn-sm">
                                        <i class="fa fa-plus me-1"/> Add Category
                                    </router-link>
                                </div>
                            </div>
                        </div>
                    </div>
                    <hr>
                    <div class="px-0 pb-0 card-body">
                        <div class="dataTable-search search-block">
                            <input v-model="search" class="dataTable-input search-input-table" placeholder="Search..." type="text">
                        </div>
                        <div class="table-responsive">
                            <table id="category-list" ref="categoryList" class="table table-flush">
                                <thead class="thead-light">
                                    <tr>
                                        <th title="name">Name</th>
                                        <th title="description">Description</th>
                                        <th title="created_at">Create at</th>
                                        <th data-sortable="false">Action</th>
                                    </tr>
                                </thead>
                                <tbody class="text-sm">
                                </tbody>
                                <tfoot>
                                    <tr>
                                        <th>Name</th>
                                        <th>Description</th>
                                        <th>Create at</th>
                                        <th>Action</th>
                                    </tr>
                                </tfoot>
                            </table>
                        </div>
                    </div>
                </div>
            </div>
        </div>
    </div>
</template>
Out of the box you will have an example of tag management (for the cases in which you are developing a blog or a shop). To access this example, click the "Examples (API)/Tag Management" link in the left sidebar or add /examples/tag-management/list-tags to the URL. You can add and edit tags here, but you can only delete them if they are not attached to any items.
You can find the compoments for tag functionality in src\views\examplesApi\TagManagement folder.
The store used for tag functionality is found in src\store\tag.module.js and you can find the service file in src\services\tag.service.js.
<template>
    <div class="py-4 container-fluid">
      <div class="row">
        <div class="col-12">
          <div class="card">
            <!-- Card header -->
            <div class="pb-0 card-header">
              <div class="d-lg-flex">
                <div>
                  <h5 class="mb-0">Tag List</h5>
                </div>
                <div class="my-auto mt-4 ms-auto mt-lg-0">
                  <div class="my-auto ms-auto">
                    <router-link :to="{ name: 'Add Tag' }"
                      class="mb-0 btn bg-gradient-success btn-sm">
                        <i class="fa fa-plus me-1"/> Add Tag
                    </router-link>
                  </div>
                </div>
              </div>
            </div>
            <hr>
            <div class="px-0 pb-0 card-body">
              <div class="dataTable-search search-block">
                <input v-model="search" class="dataTable-input search-input-table" placeholder="Search..." type="text">
              </div>
              <div class="table-responsive">
                <table id="tag-list" ref="tagList" class="table table-flush">
                  <thead class="thead-light">
                    <tr>
                      <th title="name">Name</th>
                      <th title="color">Color</th>
                      <th title="created_at">Create at</th>
                      <th data-sortable="false">Action</th>
                    </tr>
                  </thead>
                  <tbody class="text-sm">
                  </tbody>
                  <tfoot>
                    <tr>
                      <th>Name</th>
                      <th>Color</th>
                      <th>Create at</th>
                      <th>Action</th>
                    </tr>
                  </tfoot>
                </table>
              </div>
            </div>
          </div>
        </div>
      </div>
    </div>
</template>
Item management is the most advanced example included in the Pro theme, because every item has a picture, belongs to a category and has multiple tags. To access this example click the "Examples (API)/Item Management" link in the left sidebar or add /examples/item-management/list-items to the URL. Here you can manage the items. A list of items will appear once you start adding them (to access the add page click "Add item"). On the add page, besides the Name and Description fields (which are present in most of the CRUD examples) you can see a category dropdown, which contains the categories you added, a file input and a tag multi select. If you did not add any categories or tags, please go to the corresponding sections (category management, tag management) and add some.
You can find the compoments for items functionality in src\views\examplesApi\ItemManagement folder.
The store used for item functionality is found in src\store\item.module.js and you can find the service file in src\services\item.service.js.
<template>
  <div class="py-4 container-fluid">
    <div class="row">
      <div class="col-12">
        <div class="card">
          <!-- Card header -->
          <div class="pb-0 card-header">
            <div class="d-lg-flex">
              <div>
                <h5 class="mb-0">Item List</h5>
              </div>
              <div class="my-auto mt-4 ms-auto mt-lg-0">
                <div class="my-auto ms-auto">
                  <router-link :to="{ name: 'Add Item' }" class="mb-0 btn bg-gradient-success btn-sm">
                    <i class="fa fa-plus me-1" /> Add Item
                  </router-link>
                </div>
              </div>
            </div>
          </div>
          <hr>
          <div class="px-0 pb-0 card-body">
            <div class="dataTable-search search-block">
                <input v-model="search" class="dataTable-input search-input-table" placeholder="Search..." type="text">
            </div>
            <div class="table-responsive">
              <table id="item-list" ref="itemList" class="table table-flush">
                <thead class="thead-light">
                  <tr>
                    <th title="name">Name</th>
                    <th title="category.name">Category</th>
                    <th data-sortable="false">Picture</th>
                    <th title="tags.name">Tags</th>
                    <th title="created_at">Create at</th>
                    <th data-sortable="false">Action</th>
                  </tr>
                </thead>
                <tbody class="text-sm">
                </tbody>
                <tfoot>
                  <tr>
                    <th>Name</th>
                    <th>Category</th>
                    <th>Picture</th>
                    <th>Tags</th>
                    <th>Create at</th>
                    <th>Action</th>
                  </tr>
                </tfoot>
              </table>
            </div>
          </div>
        </div>
      </div>
    </div>
  </div>
</template>
Documentation built by Developers
Each element is well presented in very complex documentation.
You can read more about the documentation here.
Example Pages
If you want to get inspiration or just show something directly to your clients, you can jump-start your development with our pre-built example pages. Every page is spaced well, with attractive layouts and pleasing shapes. From specially designed dashboards for smart homes, virtual reality, and automotives to CRM admins, Vue Argon Dashboard 2 PRO has everything you need to quickly set up an amazing project.
View example pages here.
HELPFUL LINKS
- View Github Repository
- Check FAQ Page
During the development of this dashboard, we have used many existing resources from awesome developers. We want to thank them for providing their tools open source:
- Popper.js - Kickass library used to manage poppers
- Flatpickr - Useful library used to select date
- Choices JS - A nice plugin that select elements with intuitive multiselection and searching but also for managing tags.
- Charts Js - Simple yet flexible JavaScript charting for designers & developers
- FullCalendar - Full-sized drag & drop event calendar
- Dropzone - An open source library that provides drag’n’drop file uploads with image previews.
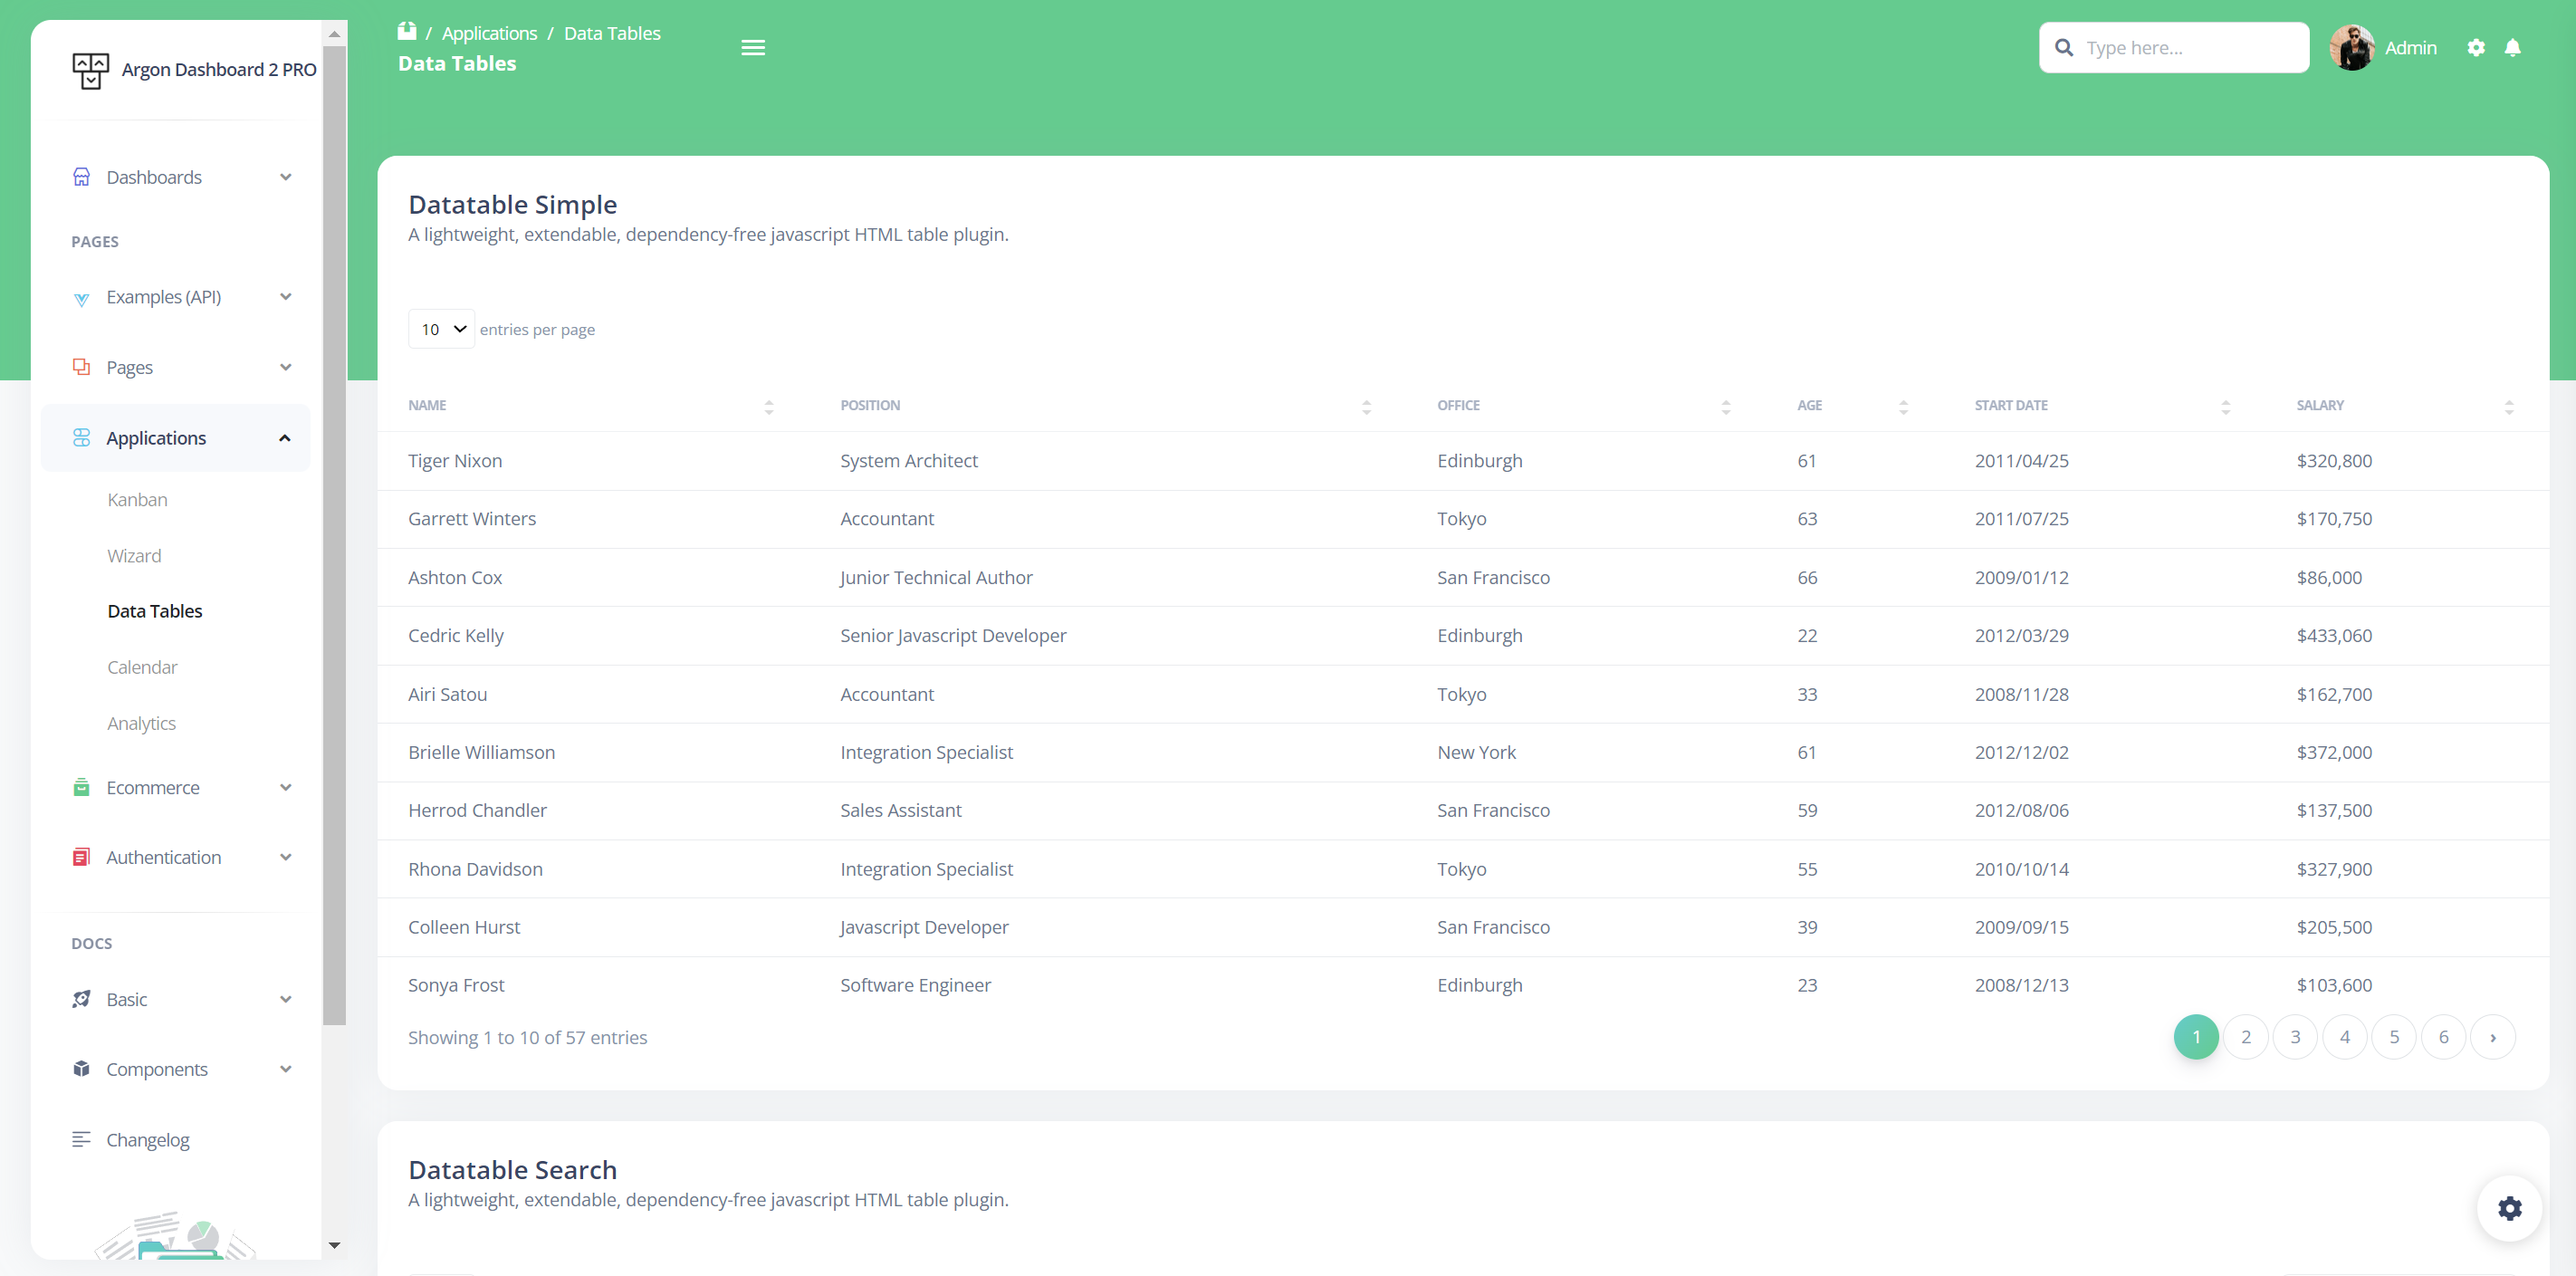
- Datatables - DataTables but in Vanilla ES2018 JS
- jKanban - Pure agnostic Javascript plugin for Kanban boards
- PhotoSwipe - JavaScript image gallery for mobile and desktop, modular, framework independent
- Quill - A free, open source WYSIWYG editor built for the modern web
- Sweet Alerts - A beautiful, responsive, customisable, accessible replacement for Javascript’s popup boxes.
- three.js - JavaScript 3D library
- Wizard - Animated Multi-step form for Bootstrap
Let us know your thoughts below. And good luck with development!
- Versions
- Demo
- Quick Start
- Documentation
- File Structure
- Browser Support
- Resources
- Reporting Issues
- Technical Support or Questions
- Licensing
- Useful Links
![]()
![]()


| HTML | Laravel |
|---|---|
 |
 |
| Vue | Vue & Laravel |
|---|---|
 |
 |
| Register | Login | Dashboard |
|---|---|---|
 |
 |
 |
| Profile Page | Users Page | Tables Page |
|---|---|---|
 |
 |
 |
Quick start options:
- Buy from Creative Tim.
- Download and Install NodeJs LTS version from NodeJs Official Page.
- Navigate to the root ./ directory of the product and run
npm installto install our local dependencies.
The documentation for the Vue Argon Dashboard 2 PRO is hosted at our website.
Within the download you'll find the following directories and files:
vue-argon-dashboard-pro-laravel
    ├── public
    │   ├── favicon.png
    │   └── index.html
    ├── src
    │   ├── assets
    │   │   ├── css
    │   │   ├── fonts
    │   │   ├── img
    │   │   ├── js
    │   │   └── scss
    │   ├── components
    │   │   ├── Icon
    │   │   ├── ArgonAlert.vue
    │   │   ├── ArgonAvatar.vue
    │   │   ├── ArgonBadge.vue
    │   │   ├── ArgonButton.vue
    │   │   ├── ArgonCheckbox.vue
    │   │   ├── ArgonInput.vue
    │   │   ├── ArgonPagination.vue
    │   │   ├── ArgonPaginationItem.vue
    │   │   ├── ArgonProgress.vue
    │   │   ├── ArgonRadio.vue
    │   │   ├── ArgonSnackbar.vue
    │   │   ├── ArgonSocialButton.vue
    │   │   ├── ArgonSwitch.vue
    │   │   └── ArgonTextarea.vue
    |   |   └── BasePagination.vue
    |   |   └── ValidationError.vue
    │   ├── examples
    │   │   ├── Cards
    │   │   ├── Charts
    │   │   ├── Navbars
    │   │   ├── PageLayout
    │   │   ├── Sidenav
    │   │   ├── Breadcrumbs.vue
    │   │   ├── Calendar.vue
    │   │   ├── Configurator.vue
    │   │   ├── Footer.vue
    │   │   └── Globe.vue
    │   ├── middleware
    │   │   └── admin.js
    │   │   └── admin_creator.js
    │   │   └── auth.js
    │   │   └── guest.js
    │   ├── mixins
    │   │   └── eventTable.js
    │   │   └── form-mixin.js
    │   │   └── showSwal.js
    │   │   └── tooltip.js
    │   ├── router
    │   ├── services
    │   │   └── auth-header.js
    │   │   └── auth.service.js
    │   │   └── category.service.js
    │   │   └── item.service.js
    │   │   └── profile.service.js
    │   │   └── role.service.js
    │   │   └── tag.service.js
    │   │   └── user.service.js
    │   ├── store
    │   │   └── auth.module.js
    │   │   └── category.module.js
    │   │   └── index.js
    │   │   └── item.module.js
    │   │   └── profile.module.js
    │   │   └── role.module.js
    │   │   └── tag.module.js
    │   │   └── user.module.js
    │   ├── views
    │   │   ├── applications
    │   │   ├── auth
    │   │   ├── dashboards
    │   │   ├── ecommerce
    │   │   ├── examplesApi
    │   │   ├── pages
    │   │   └── Home.vue
    │   ├── App.vue
    │   ├── main.js
    │   └── argon-dashboard.js
    ├── .browserslistrc
    ├── .eslintrc.js
    ├── .gitignore
    ├── babel.config.js
    ├── CHANGELOG.md
    ├── ISSUE_TEMPLATE.md
    ├── package.json
    └── README.md
At present, we officially aim to support the last two versions of the following browsers:


- Live Preview
- Buy Page
- Documentation is here
- License Agreement
- Support
- Issues: Github Issues Page
We use GitHub Issues as the official bug tracker for the Argon Dashboard 2 PRO React. Here are some advices for our users that want to report an issue:
- Make sure that you are using the latest version of the Argon Dashboard 2 PRO React. Check the CHANGELOG from your dashboard on our website.
- Providing us reproducible steps for the issue will shorten the time it takes for it to be fixed.
- Some issues may be browser specific, so specifying in what browser you encountered the issue might help.
If you have questions or need help integrating the product please contact us instead of opening an issue.
- Copyright 2022 Creative Tim & UPDIVISION
- Creative Tim license
-
More products from Creative Tim
-
Freebies from Creative Tim
-
Affiliate Program (earn money)
Twitter: https://twitter.com/CreativeTim
Facebook: https://www.facebook.com/CreativeTim
Dribbble: https://dribbble.com/creativetim
Google+: https://plus.google.com/+CreativetimPage
Instagram: https://instagram.com/creativetimofficial
Twitter: https://twitter.com/updivision?ref=vadl-readme
Facebook: https://www.facebook.com/updivision?ref=vadl-readme
Dribbble: https://dribbble.com/updivision?ref=vadl-readme
Linkedin: https://www.linkedin.com/company/updivision?ref=vadl-readme
Updivision Blog: https://updivision.com/blog/?ref=vadl-readme