


It is a lightweight Docker container for managing Nginx hosts with REST api and a simple, minimal web UI. This application is developed using Flask in the backend, and VueJS with Quasar in the frontend. SQLite is used as a database.
I have used Nginx Proxy Manager to manage proxy hosts in past and I really loved it. This time, I am working on a project where users require an option to frequently update host configuration programmatically; i.e. similar to Nginx Proxy Manager. Therefore, I created a REST API for that purpose. After using the api for few days, I decided to pack it as a docker container for easy deployment. While doing so, I thought why not create a simple user interface and give user an option to either enable/disable both Web UI and REST API. Hence, here it is.
It is the lite version of original Nginx Proxy Manager and only contains basic features. I recommend to use Nginx Proxy Manager should you require additional features.
- Install Docker in your machine
- Make sure port
80and443are open and available in your machine
-
Create a new
docker network:docker network create npmlite_sd -
Pull and run
npmlite docker container:docker run -p 80:80 -p 443:443 --network npmlite_sd -v ~/npmlite/data:/data -v ~/npmlite/ssl:/etc/letsencrypt --name npmlite -d mrsajjal/npmlite -
Go to
http://localhostorhttp://your-machine-ip -
The default login info for web interface is:
Email Password npm@npmlite.com npmlite
-
You can choose to either enable or disable
Web InterfaceandRest API -
If you followed above
docker run command, edit:~/npmlite/data/npmlite_config/config.json -
If you mapped different directory, find and edit
/data/npmlite_config/config.jsonConfiguration option Type Description enable_web_portalboolEnable or disable web portal. Default is truejwt_secret_keystringSecret to protect JWT token with. Required if web interface is enabled JWT_COOKIE_SECUREboolEnable or disable HTTPS only JWT cookies. Default is falseenable_rest_apiboolEnable or disable REST API. Default is falseapi_keystringAPI Key for REST API endpoints. Required if REST API is enabled multi_user_apiboolEnable or disable multi user API. Default is false
Info: It is recommended to change
jwt_secret_keyand restart the container after making configuration changes.
If you have enabled REST API, you can consume it and programmatically manage nginx hosts.
-
Check if the API server is running
-
Endpoint:
GET /api/statuscurl http://your_machine_ip/api/status -
Returns:
{"serverStatus":"API Server Up & Running..."}
-
List all availabel Hosts
-
Endpoint:
GET /api/list -
If
multi_user_apiisfalse:curl http://your-machine-ip/api/list -H "Authorization: Bearer <api_key>" -
If
multi_user_apiistrue:curl http://your-machine-ip/api/list -H "Authorization: Bearer <api_key>" -H "userID: <user_id>" -
Returns:
{
"domain_list": [
   {
      "HSTS": "True",
      "block_exploit": "True",
      "domain": "example.com",
      "enableSSL": "True",
      "forceSSL": "True",
      "http2": "True",
      "id": "b3dc6c8667bc46c4b885f88fe723b40e",
      "ips": [
      {
         "ip": "localhost",
         "port": "40045"
      }
      ],
      "is_disabled": 0,
      "redirect_url": "",
      "static_path": "",
      "timestamp": "1635753241116",
      "type": "reverse_proxy",
      "userID": "e1a915e55ddc4f14b52dc4632ed51e09",
      "websocket": "True"
   }
]
}
-
Endpoint:
POST /api/requestSSLParameter Type Description domainstringRequired. Domain you want to request SSL certificate for emailstringRequired. Email address to setup an account with Let's Encrypt agree_le_tosboolRequired. Accept or deny Let's Encrypt's terms of services userIDstringUser ID to associate SSL with Required if multi_user_apiistruecurl -X POST http://your-machine-ip/api/requestSSL -H 'Content-Type: application/json' -H 'Authorization: Bearer <api_key>' -d '{"domain":"example.com", "email":"me@mydomain.com", "agree_le_tos":true}' -
Returns:
{
"userID": "e1a915e55ddc4f14b52dc4632ed51e09",
"domain": "example.com",
"ssl_cert_path": "/etc/letsencrypt/live/example.com/fullchain.pem",
"ssl_key_path": "/etc/letsencrypt/live/example.com/privkey.pem"
}
-
List all available SSL certificates
-
Endpoint:
GET /api/listSSL -
If
multi_user_apiisfalse:curl http://your-machine-ip/api/listSSL -H "Authorization: Bearer <api_key>" -
If
multi_user_apiistrue:curl http://your-machine-ip/api/listSSL -H "Authorization: Bearer <api_key>" -H "userID: <user_id>" -
Returns:
{
"ssl_list": [
   {
      "cert_info": {
      "ssl_active_from": "Nov 1 2021",
      "ssl_expiry": "Jan 30 2022",
      "ssl_issuer": "Let's Encrypt"
      },
      "domain": "example.com",
      "id": "51976cbc949a450ab9bcc1892242b0e0",
      "ssl_cert_path": "/etc/letsencrypt/live/example.com/fullchain.pem",
      "ssl_key_path": "/etc/letsencrypt/live/example.com/privkey.pem",
      "timestamp": "1635753215599",
      "userID": "e1a915e55ddc4f14b52dc4632ed51e09"
   }
]
}
-
Endpoint:
POST /api/createParameter Type Description domainstringRequired. Domain name that you want to add typestringRequired. static,redirectorreverse_proxystatic_pathstringLocation of static files. Required if typeisstaticredirect_urlstringURL to redirect. Required if typeisredirectipsarray/list of objectsIP/Hostname and/or port to forward. Required if typeisreverse_proxyEXample: [ { "ip": "localhost", "port": "40045" }, { "ip": "192.168.1.2"} ]block_exploitboolEnable to block common exploits websocketboolEnable to support websocket, useful for socket.io based applications userIDstringUser ID to associate Host with Required if multi_user_apiistrue -
If you have obtained a SSL certificate and want to enable it, include the following params:
Parameter Type Description enableSSLboolEnable to listen for httpsforceSSLboolEnable to force redirect httprequests tohttpshttp2boolEnable to support http2HSTSboolEnable for strict transport security ssl_cert_pathstringAbsolute path to the ssl certificatefile. Required ifenableSSListruessl_key_pathstringAbsolute path to the ssl keyfile. Required ifenableSSListruecurl -X POST http://your-machine-ip/api/create -H 'Content-Type: application/json' -H 'Authorization: Bearer <api_key>' -d '{"domain": "example.com", "type":"reverse_proxy", "ips": [{"ip": "localhost", "port": "3000"}], "block_exploit": true"}' -
Returns:
{"Success":"example.com added successfully"}
-
Params are similar as of Add New Host
-
Endpoint:
POST /api/updatecurl -X POST http://your-machine-ip/api/update -H 'Content-Type: application/json' -H 'Authorization: Bearer <api_key>' -d '{"domain": "example.com", "type":"static", "static_path": "/etc/html", "block_exploit": true"}' -
Returns:
{"Success":"example.com record updated successfully"}
-
Temporarily disable a HOST while preserving all of its configuration
-
Endpoint:
POST /api/disableParameter Type Description domainstringRequired. The domain that you want to disable userIDstringUser ID associated with Host Required if multi_user_apiistruecurl -X POST http://your-machine-ip/api/disable -H 'Content-Type: application/json' -H 'Authorization: Bearer <api_key>' -d '{"domain": "example.com"}' -
Returns:
{"Success":"example.com is disabled!"}
-
To enable previously disabled a HOST
-
Endpoint:
POST /api/enableParameter Type Description domainstringRequired. The domain that you want to enable userIDstringUser ID associated with Host Required if multi_user_apiistruecurl -X POST http://your-machine-ip/api/enable -H 'Content-Type: application/json' -H 'Authorization: Bearer <api_key>' -d '{"domain": "example.com"}' -
Returns:
{"Success":"example.com is enabled!"}
-
Endpoint:
POST /api/deleteParameter Type Description domainstringRequired. The domain that you want to delete userIDstringUser ID associated with Host Required if multi_user_apiistruecurl -X POST http://your-machine-ip/api/delete -H 'Content-Type: application/json' -H 'Authorization: Bearer <api_key>' -d '{"domain": "example.com"}' -
Returns:
{"Success":"example.com removed successfully"}
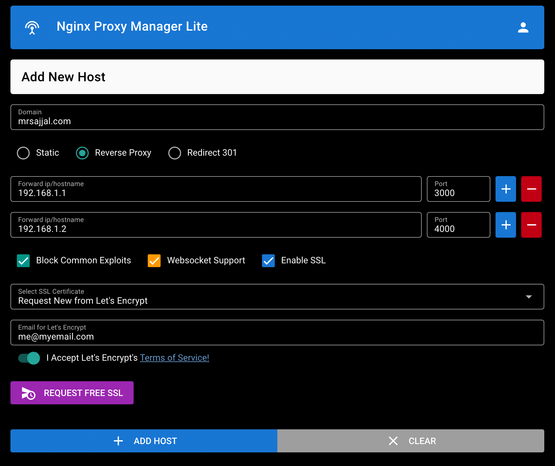
Add Hosts:
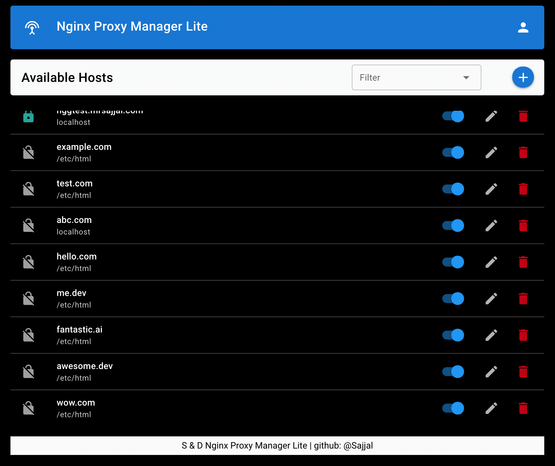
View Hosts:
With Love,
Sajjal